Table of contents
Getting Started with Leads
Monday September 25, 2023-39 min readIntroduction
Leads are potential customers or prospects who have shown interest in your product or service and may eventually become paying customers. They are a crucial part of the sales and marketing process as they represent the pool of people that your sales team can target and hopefully convert to sales. The Leads app is a tool for capturing, tracking and managing these leads that your company has generated. This guide will go over the full lead pipeline from adding new leads to editing lead information and following up with prospective customers.
How do I find leads?
Before you can add any leads to the Leads app, you need to acquire them. This guide assumes that you have already gone through the process of obtaining leads, but if you haven’t yet, here are a few different marketing efforts that are typically done for this purpose:
- Content marketing
- Blogging – Create and regularly publish informative and engaging blog posts that address your target audience’s pain points and interests. Optimize your content for search engines (SEO) to attract organic traffic.
- Ebooks or Whitepapers – Offer valuable downloadable resources in exchange for visitors’ contact information, such as ebooks, whitepapers, guides, or templates.
- Webinars – Host webinars on topics relevant to your industry, allowing participants to register and provide their contact details.
- Social media marketing
- Social media posts – Share content and engage with your audience on platforms like Facebook, Twitter, LinkedIn, Instagram, and others. Use lead generation features like lead forms and Sign up buttons when applicable.
- Paid advertising – Run targeted advertising campaigns on social media platforms to reach specific demographics and interests.
- Email marketing
- Newsletter sign-ups – Encourage website visitors to subscribe to your email newsletter for updates, offers, and valuable content.
- Lead magnets – Send targeted emails to your existing subscribers with exclusive offers or content to encourage sharing and referrals.
- Search engine optimization
- Optimize your website and content to rank higher in search engine results, making it easier for potential customers to find you online.
- Networking and partnerships
- Attend industry events, conferences, and trade shows to connect with potential leads and partners.
Let’s get started
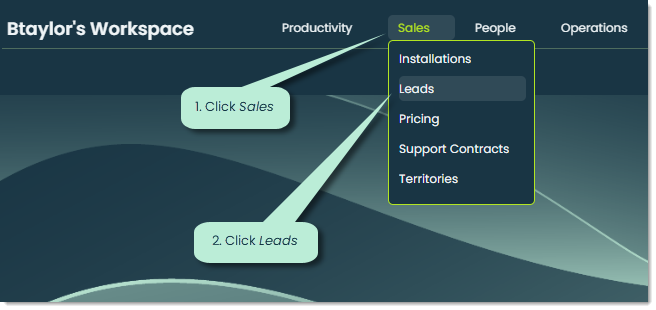
Once you’ve acquired your leads, you’re ready to use the app! From the top dock, click on the Sales category and select Leads from the dropdown.
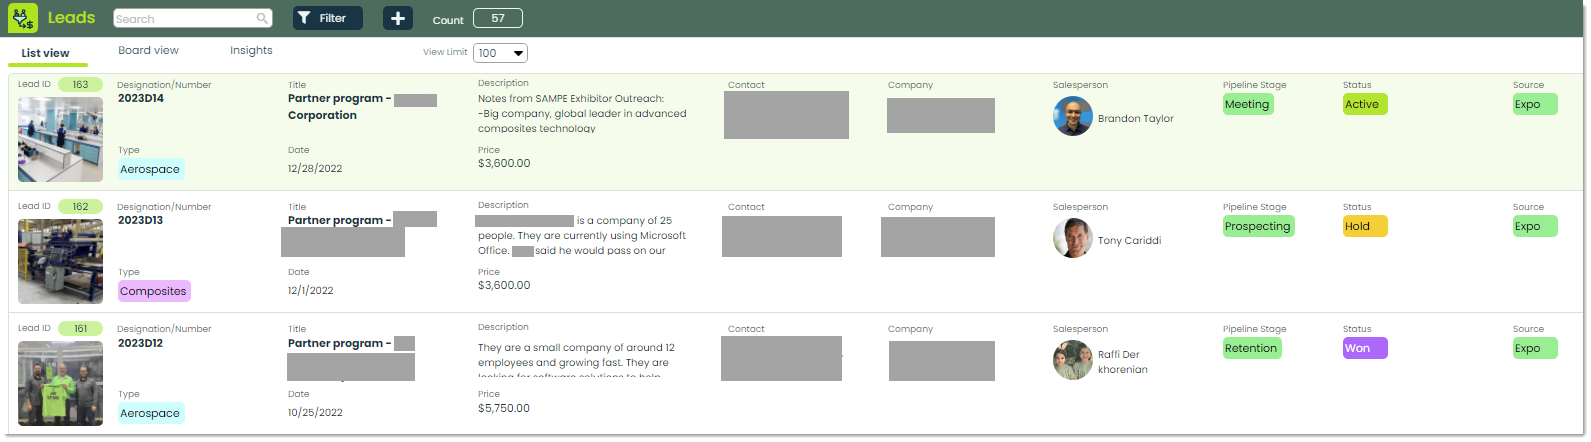
When you first open the app, you’ll see a screen that looks like this:
Let’s go over each of the three main tabs.
List view – This is the default tab when you open the app. From this view, you can see all of your leads in an organized list. Let’s look at the different areas of a lead record from this view.

Lead ID – Each lead has its own unique number which is used to identify and distinguish it from any other lead record.

Image – You can link an image to your lead for a visual reference.

Designation/Number – You can optionally assign a number to a lead which is meant to serve as a standardized way for you to label your leads.

Type – A type is a method of classifying your leads into a specific category. They are a great way to organize all of your different leads and serve to help you find the records you need. Your lead types will ultimately come down to what best suits your business. For example, at Appward, we have lead types based on the industry of the company we are trying to work with. Some of these include Human Resources, Import-Export and Healthcare.

Title – This is the name of the lead, which is typically the name of the prospective customer or company.

Date – This is the date that the lead was created.

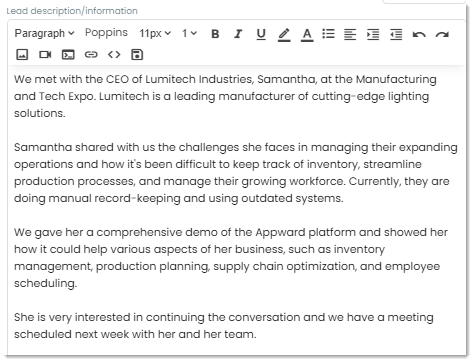
Description – This section is used for key details about the lead. List the products or services the lead has expressed interest in or inquired about. This information helps tailor your sales pitch and communication. Additionally, summarize any important details or insights about the lead, such as their specific needs or pain points and any challenges they are facing that your product or service can address.

Price – This is the projected and/or actual price associated with converting a lead to a sale.

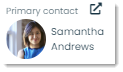
Contact – This identifies the primary contact of the customer and is used as one of the central points of communication when try to convert leads.

Company – This section displays the company that the lead references.

Salesperson – This signifies the main sales representative of a lead. They play a crucial role in nurturing and guiding leads through the various stages of the sales funnel with the ultimate goal of turning them into paying customers.

Pipeline stage – The pipeline stage refers to a specific phase or step in the sales process that a lead or opportunity goes through as it progresses toward conversion into a customer. The number and names of pipeline stages can vary from one organization to another, depending on their specific sales process. For example, Appward’s pipeline stages are Prospecting, Qualifying, Meeting, Proposal, Closing and Retention.

Status – In the context of leads, a status refers to the current state of a lead in the sales or marketing process. It helps sales and marketing teams prioritize their efforts and determine the appropriate actions to take with each lead. Statuses can vary across different organizations. The way Appward does it, the statuses for leads are Active, Hold, Won, Lost, Requires response, and Spam.

Source – Knowing the source of a lead helps sales and marketing teams tailor their communication and engagement strategies. Different lead sources may indicate varying levels of familiarity with the company, product, or service, and this information can guide the approach taken when reaching out to leads. Some sources that Appward uses are Website to show that the lead came from our sales form at appward.com and Expo to show that the lead was acquired at a show.

Tags – Tags are similar to Types in that they are key terms used to group and organize leads into different categories. This is great for searching for specific records. The main difference is that each lead can have one type but multiple tags. Therefore, tags tend to be a little more narrow and particular. For example, you can have a lead of type Expo to indicate that your lead was acquired at an exhibit. For the tags, you can have the name of the show as a tag, as well as whether the lead was cold, warm or hot.

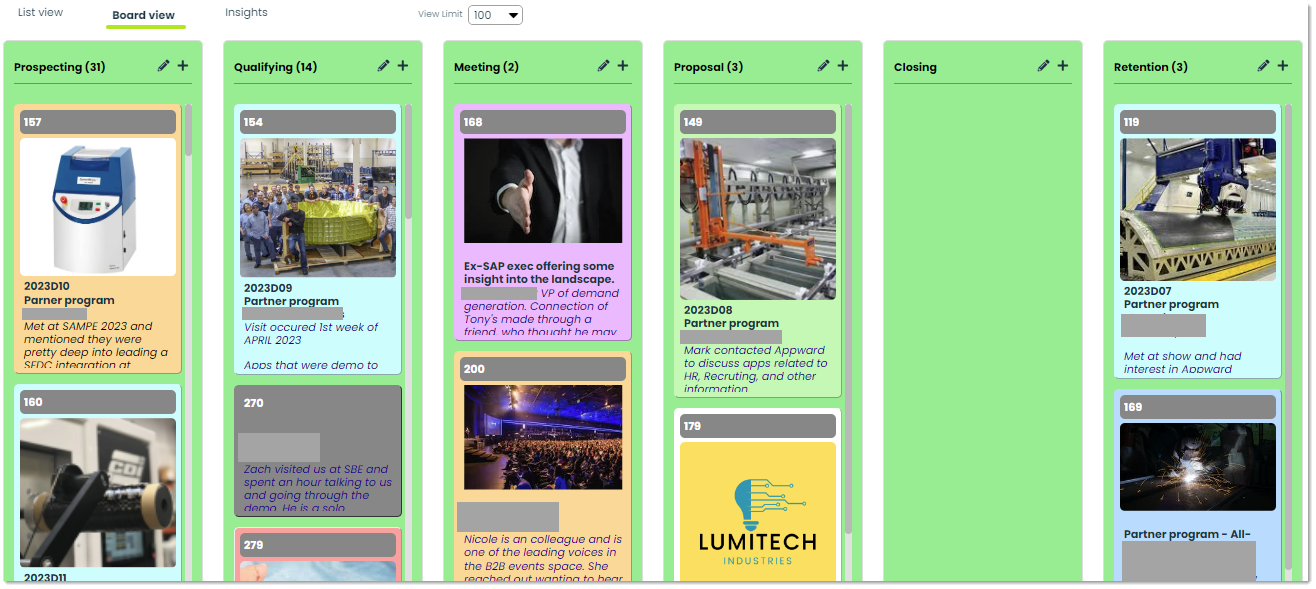
Board view – This tab provides a kanban-style view of your leads. The different lists represent the different pipeline stages, and each card represents an individual lead. The board view offers improved visibility and better workflow management, making it a valuable tool for teams and organizations looking to optimize their lead processes.
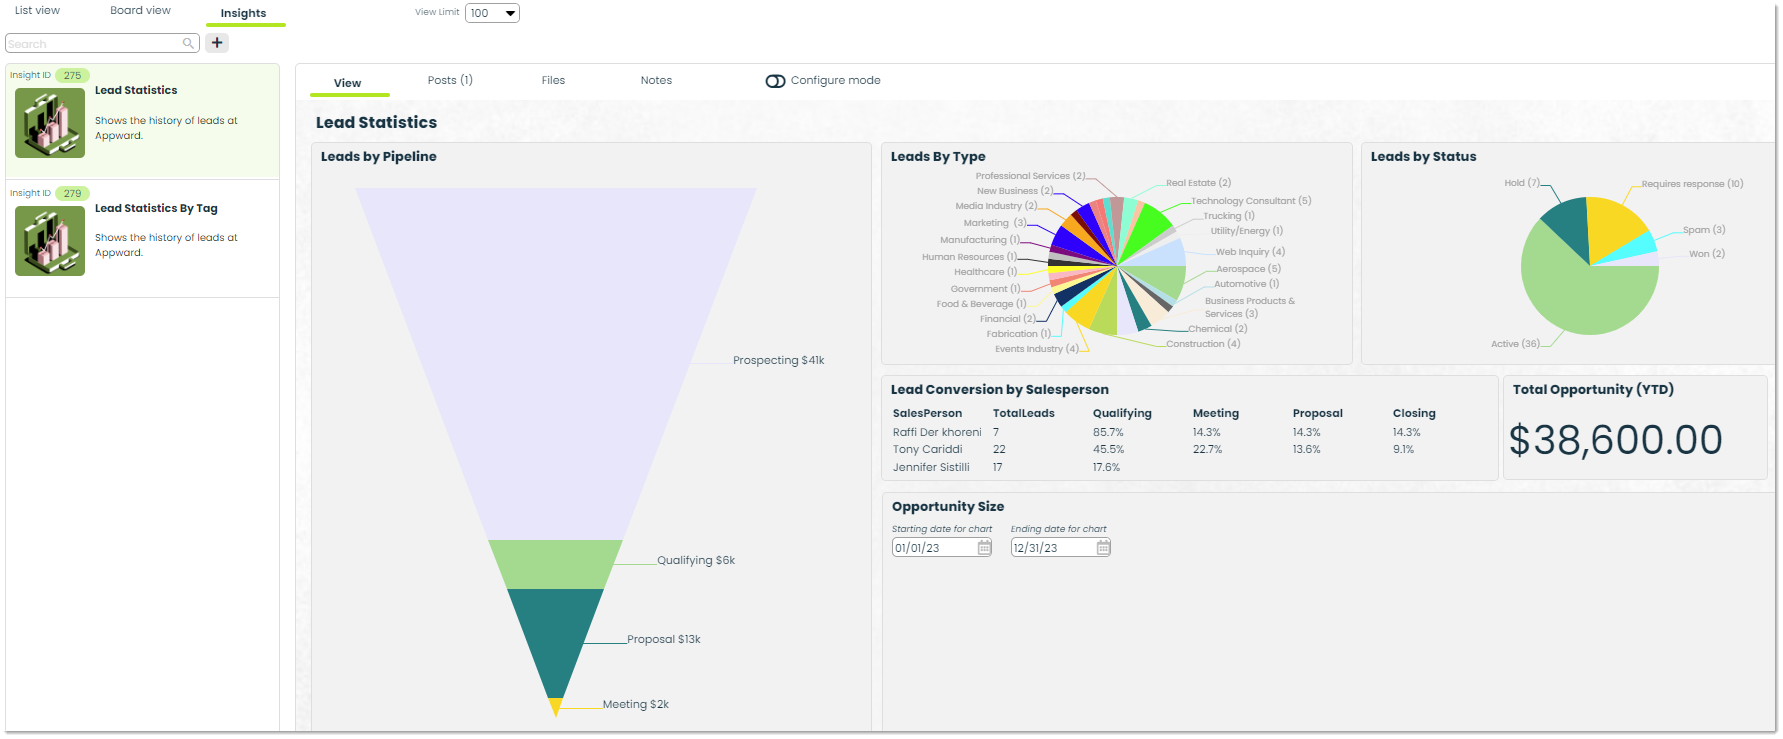
Insights – This tab is used to analyze data of your leads. You can configure highly-customizable queries for gaining valuable, measurable components of your leads such as sales conversion rates, leads by industry and more. For more on Insights, refer to our Getting Started with Insights guide.
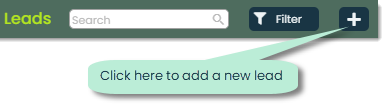
Let’s add a new lead
From any tab, click the + button in the header of the app screen to add a new lead.
Doing so will open a popup for entering in the new lead’s information.
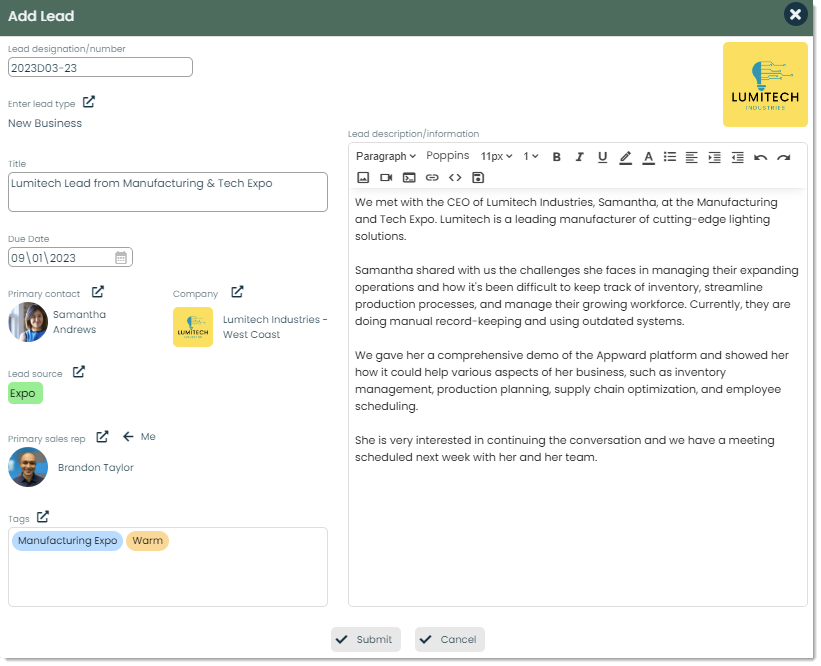
For explanation of each of the fields in this popup, please refer to the previous section under List view. Let’s cover how to add in the information for each field properly.
Designation/Number – Click anywhere in the textbox and type the designation or number you’d like to give the lead.
Type – To enter a lead type, click on the external link icon next to the Enter lead type caption.

This will bring up a popup for either selecting an existing type or creating a new one.
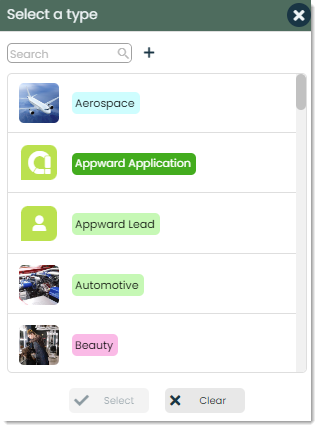
To select an existing type, scroll through the list of types or search for it in the top search bar and click on the row of the type you’d like. Then, click Select at the bottom to make that selection. You can modify your selection of type by clicking the external link icon again. To add a new type, click the + button next to the search bar to bring up a screen for creating a new lead type. Here, you can assign the name of the type, a type image, and a color scheme of the type. Click Update to create and select that new type.

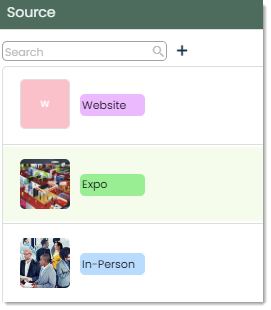
Image – You can select an image by hovering over the box in the top-right corner and clicking the + Image button.

This will open a popup for selecting an image from a variety of sources as indicated by the description on the right-hand side of each.
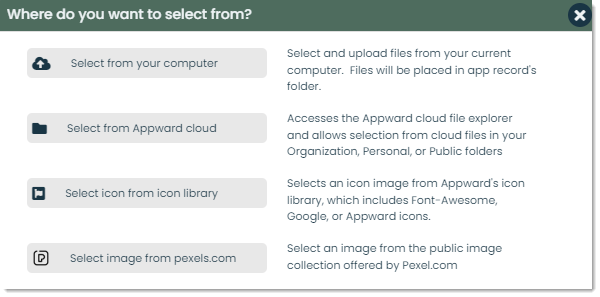
Click the button for the source you’d like to retrieve the image from, then make your image selection. You can modify the image by hovering over the image box and clicking + image again.
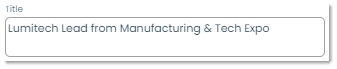
Title – Click anywhere in the textbox and type the title of the lead as desired.
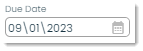
Due date – If applicable, you can assign a due date to a lead. You can do so by either clicking in the whitespace of the textbox and manually typing out a date or by clicking the calendar icon on the right side of the textbox.
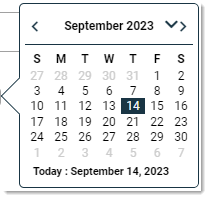
This will bring up a calendar for you to easily click and select a deadline.
Primary contact – To add a primary contact, click the external link icon next to the Primary contact caption.
From here, a popup for finding or creating a new contact will appear.

To search for existing contacts, make sure the box next to Search existing at the top is checked and use the Search section on the left side to search by either company or contact information.
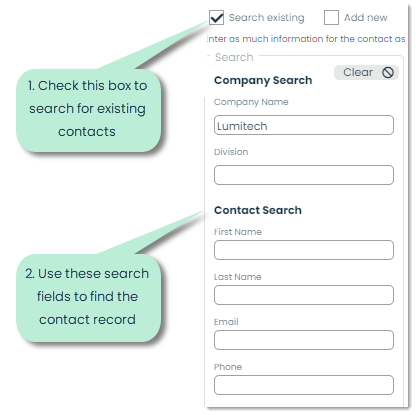
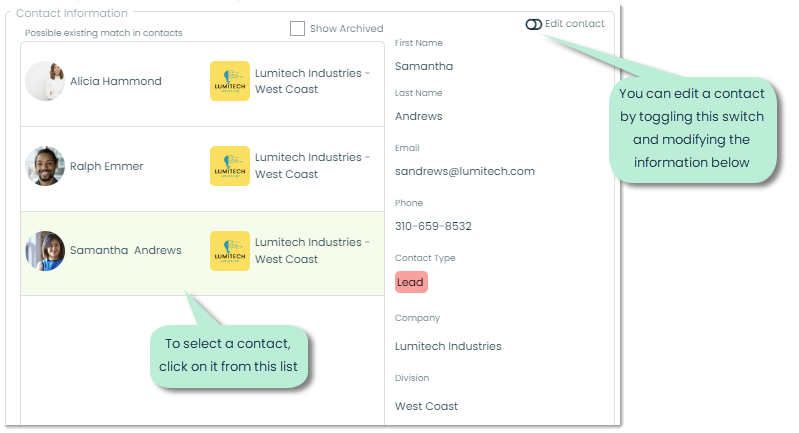
As you type and click out of the text fields, results will populate the Contact information section in the middle. You can choose to include archived records by checking the box next to Show Archived in the top right area. If you find the contact from the list, you can click on it and confirm that their information is correct on the right side of the screen as well as edit that contact’s information by toggling the switch next to Edit contact in the top right corner.
If the contact doesn’t exist, you can create it by checking the box next to Add new in the top-right portion of the screen. The addition of a primary contact is intended to be as specific as possible, including contact as well as company information if applicable.
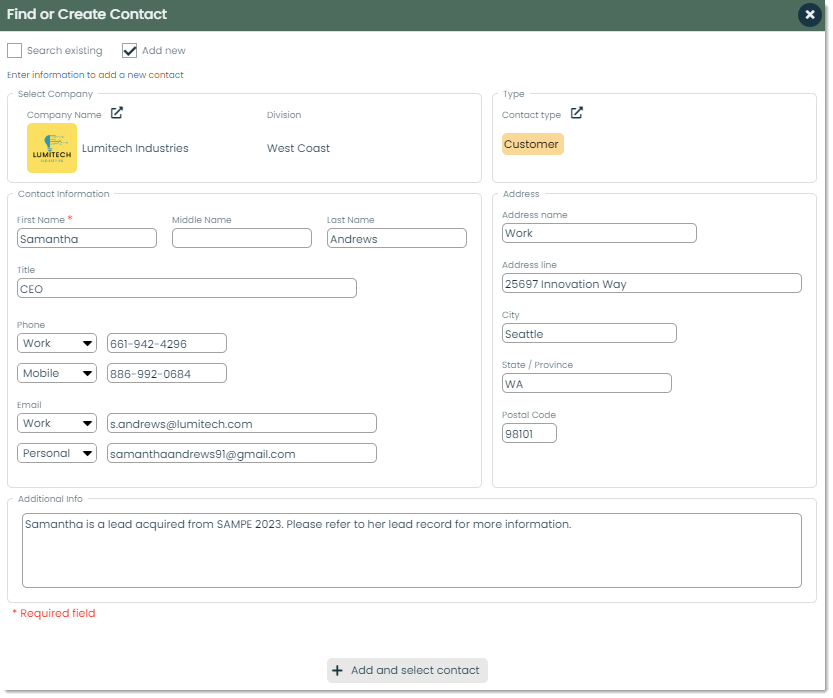
The Select Company portion of the popup is used to indicate the company of the primary contact. Clicking on the external link icon next to Company Name will open another popup for either selecting it from your existing companies or adding a new company. For searching for an existing company, you can use any of the filters at the top of this screen to quickly find the company you’re looking for.
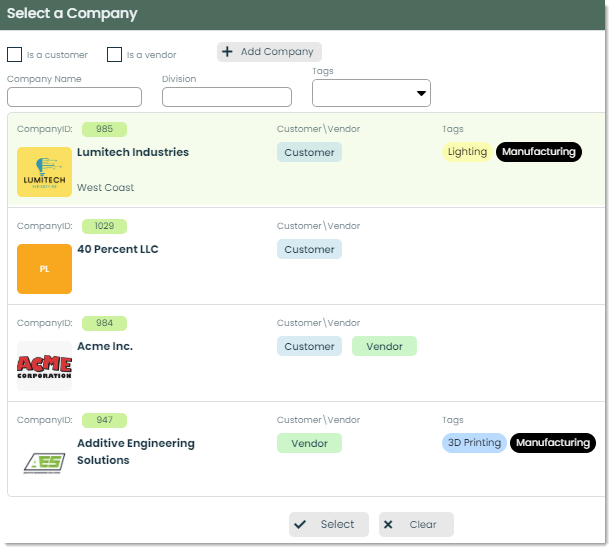
If the company doesn’t exist yet, you can add it by clicking the + Add Company button at the top of the popup. This will open a popup for adding the new company’s details. Let’s go over each page of this process.
1. Company Details
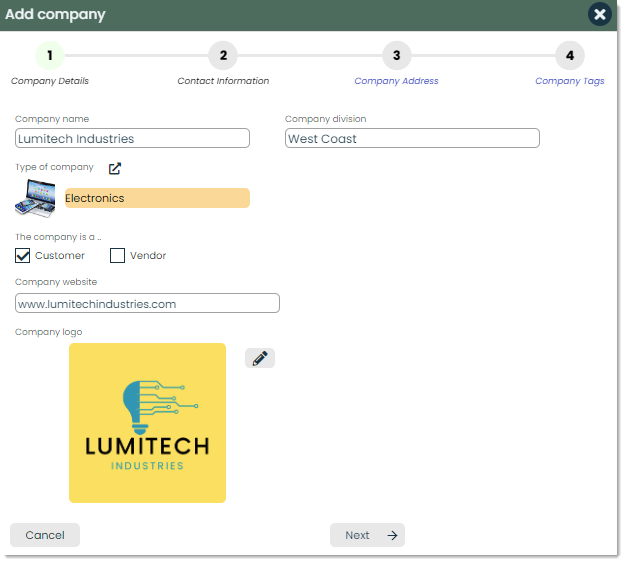
Company name – The name of the company goes here.
Company division – If the company belongs to a specific division, you can indicate that with a company division.

Type of company – Similar to leads, a company can be categorized into a type. You can either make a selection from the existing types or add a new type.

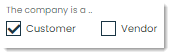
Customer/vendor – These checkboxes can be used to indicate whether the company in relation to your company is a customer, a vendor or both.
Company website – If the company has a website, you can indicate that here.

Company logo – For a better visual representation of the company, you can add in a logo from either your computer or the Appward file explorer.
2. Contact Information
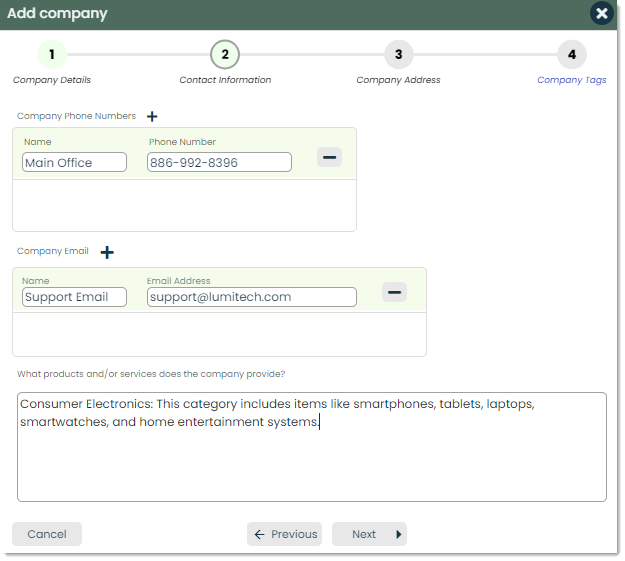
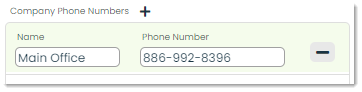
Company Phone Numbers – Phone numbers can be added to a company by inputting the name of the phone number (Main, Work, Mobile, etc.) and the number itself. You can add as many phone numbers as desired with the + button next to Company Phone Numbers or remove any by clicking the – button next to the number you want to delete.
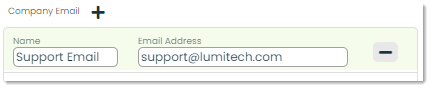
Company Email – Emails can be added with the same process as adding in phone numbers. You can add as many emails as desired.
Products and/or services of company – For more context into the company, you can include the products and services that they provide with this section.

3. Company Address
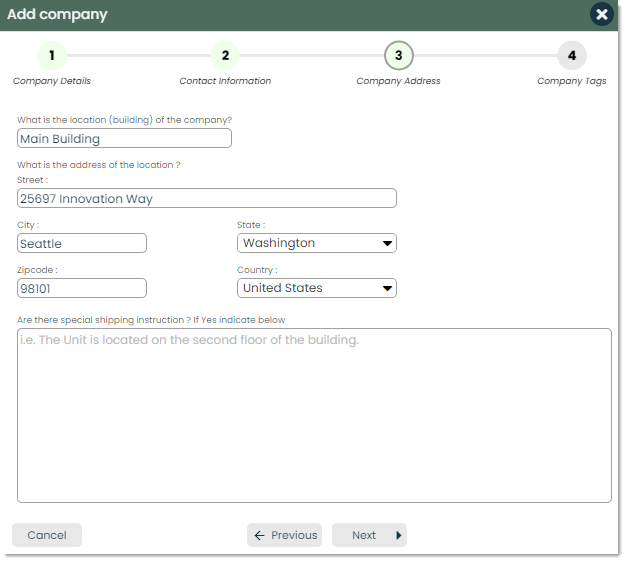
Location (building) of company – This is the name of the location such as Main Building or Second Office.
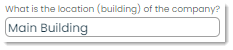
Address of location – Here is where you’d input the address of the location.
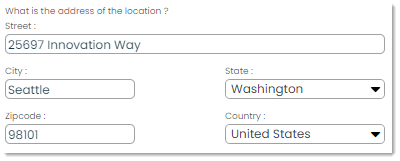
Special shipping instructions – If there are any special shipping instructions associated with this location, you can indicate that here.
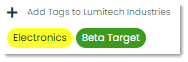
4. Company Tags
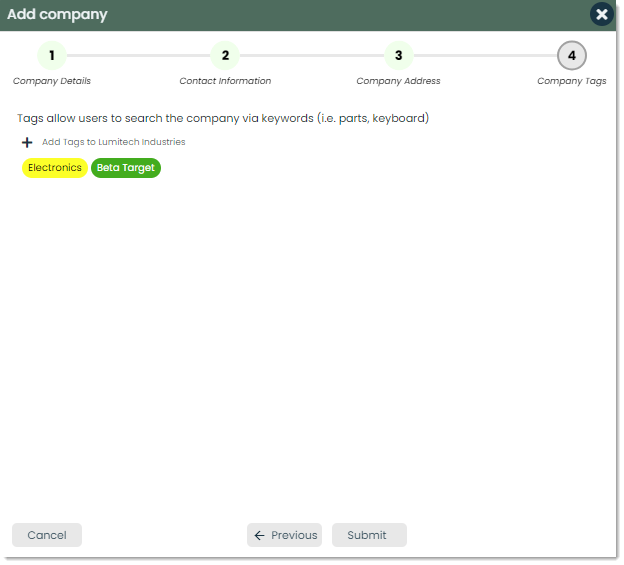
Add tags – Similar to Lead tags, you can specify company tags to categorize the company for better organization and searchability.
Click the Submit button at the bottom of the Add company popup to add the new company, then select it from the company selector popup.
To confirm the selection of the company, click the Select button at the bottom of the Select a Company screen. Then, click the + Select contact button at the bottom of the screen to select the primary contact.
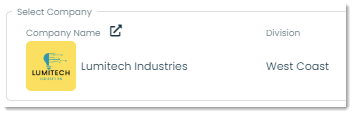
Company – Please refer to the second portion of the Primary contact field for selecting a company.

Lead source – To add a lead source, click the external link icon next to Lead source. This will open a popup for either selecting an existing source or adding a new source with the + button next to the search bar. Sources are created in a similar fashion to Lead types. Click Select at the bottom to confirm your choice.

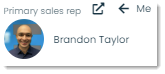
Primary sales rep – To link a primary sales rep, you can either click the external link icon which will bring up a list of your organization’s contacts to choose from, or you can click the Me button next to the external link icon to set the rep to yourself.

Tags – To add tags to the lead, click the external link icon and check the boxes next to the tags you’d like to add. If you want to add in your own tags, you can do so with the + button at the top of the screen or you can modify existing tags by clicking the pencil button. Once you’ve made your selection, click the Ok button at the bottom.

Lead description/information – The lead description can be written in the embedded HTML editor. You can style the description however you’d like with the available formatting tools such as font face and size.
Once you have entered all the desired information for your lead, click Submit at the bottom to create the lead. A flyout will appear with the details of the newly-created record.
How to view and edit lead information
From either the List view or Board view tabs, you can view the details of a lead by clicking on its record.
For list view, this would be done by clicking on any area within a lead’s row. For board view, this would be done by clicking on any card. This will open a flyout with all the details of the lead.
For definitions on any of these fields, please refer to the List view section of the Let’s get started chapter. Let’s go over some of the additional fields and elements found in the General tab.
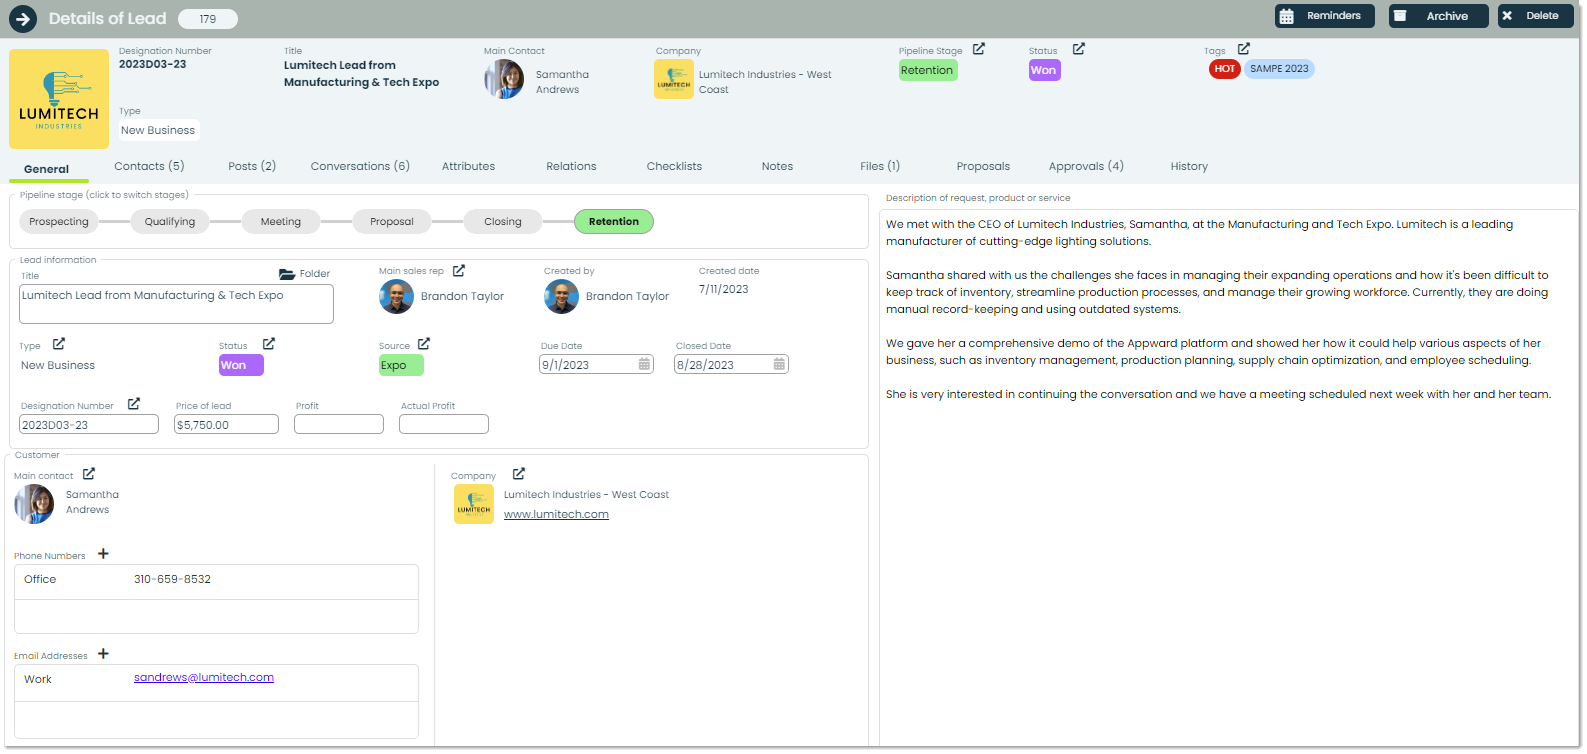
Pipeline stage (progress element) – This feature is for quickly changing the pipeline stage of a lead. Simply click the stage name from the progress bar and the pipeline stage for that lead will change.

Closed date – The closed date refers to the specific date on which a sales opportunity or lead is successfully converted into a paying customer or closed as a sale. It helps sales teams and managers track the progress of leads through the sales funnel. Knowing when a lead was closed provides insights into the sales cycle’s duration and efficiency.
Profit – Profit, in the context of a sales lead, refers to the estimated or projected financial gain that a company expects to make from a particular lead if they successfully convert that lead into a paying customer. It takes into account factors such as the lead’s potential lifetime value, the size and frequency of purchases, and any associated costs (e.g., acquisition costs, production costs, marketing expenses). Essentially, it represents the expected revenue minus the associated costs for a specific lead.
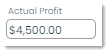
Actual Profit – Actual profit, on the other hand, is the real financial gain a company realizes after converting a sales lead into a customer. It takes into account the revenue generated from the converted lead, as well as all the actual costs incurred in the process. This includes not only the direct costs associated with acquiring and serving the customer but also any indirect costs, such as overhead and operational expenses.
How to assign contacts to a lead
Within the Contacts tab of the details flyout of any lead, you’ll find all of the contacts associated with it and their role in the process.
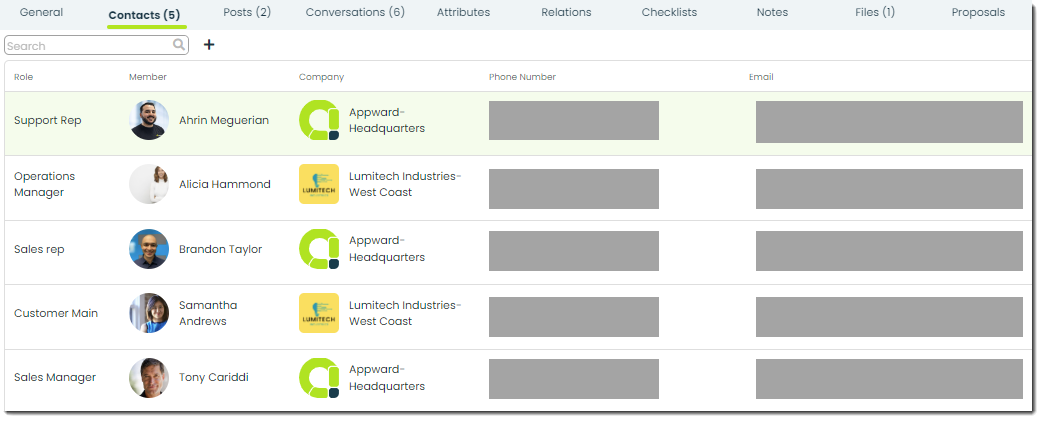
By default, the primary contact – the main person who is trying to be converted to a paying customer, and the main sales rep are linked as contacts on this page. However, there might be times where more than just those people are involved in the lead proceedings. For example, even though Samantha Andrews of the above lead is the main customer, she may want to bring along someone from her staff such as Alicia Hammond to get a second opinion on becoming a customer. On that same note, even if you are the main sales rep, you may want to bring your manager on board to oversee the lifecycle of the lead and make sure everything runs as best as it can. This would be the place to add those additional people.
To add a new contact, click the + button next to the search bar.
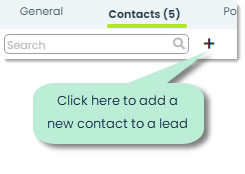
This will open a popup for adding a new contact along with their role in the lead process.
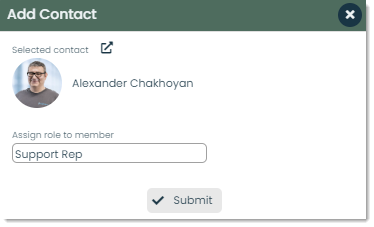
Select a contact by clicking the external link icon next to Selected contact and choosing the person you’d to add. Then, type their role in and click Submit to add that contact. Repeat this process for as many contacts you would like to involve in a lead.
How to conduct and retain conversations with a lead
Leads provides an intuitive way of conducting and storing a log of the conversations that you’ve had with your potential customers through Conversations. This can be found in the Conversations tab of any lead’s detail page.
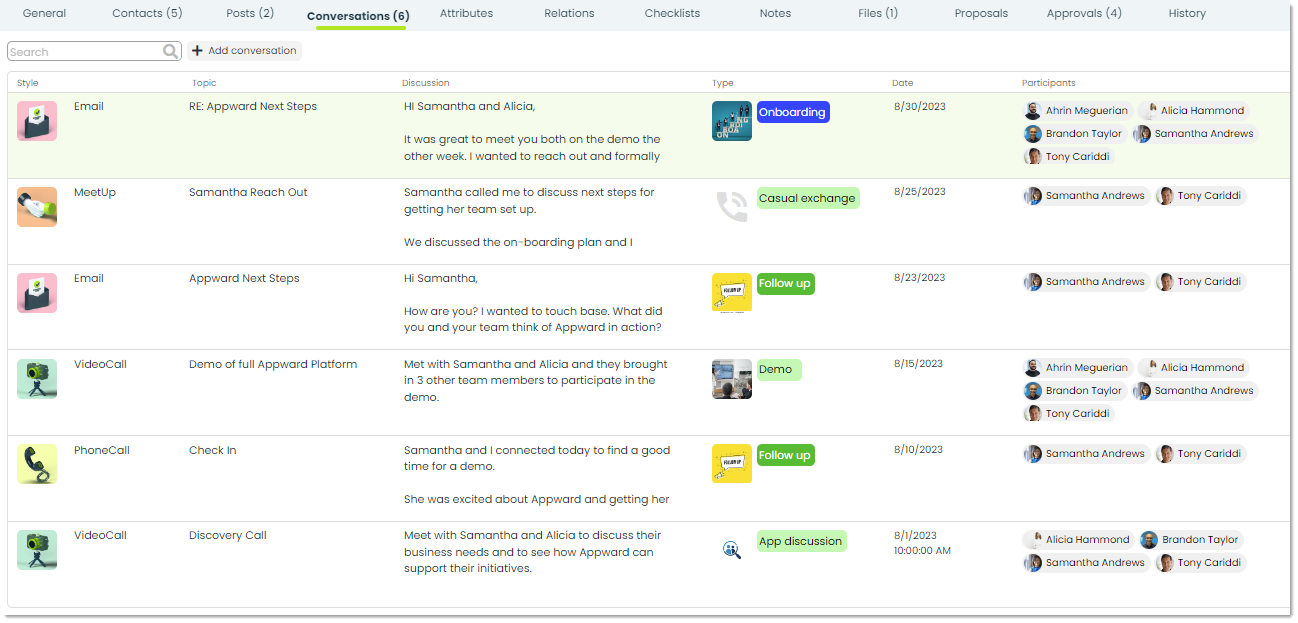
Conversations are just as they sound. They are interactions had between a group of people.
Let’s try adding a conversation to see what that process looks like. I just sent an email to Samantha from Lumitech and want to retain what I said for the rest of the applicable participants of the lead to follow along. From the main screen of the Conversations tab, click the Add conversation button found next to the search bar.

This will open a popup for a adding a new conversation to your lead.
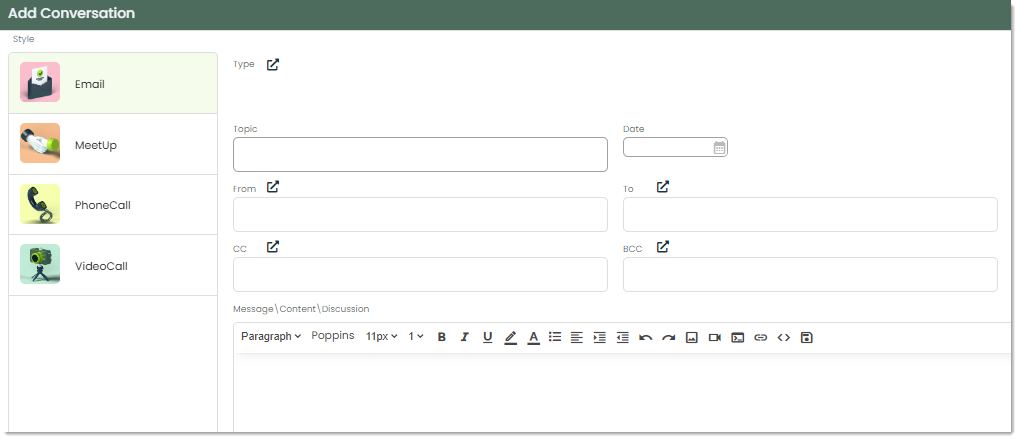
In Appward, conversations can be added in one of the four methods known as styles. The four conversation styles are email, meetup – a meeting of some sort, phone call and video call. Depending on the style of conversation, a slightly different set of fields will appear. For example, emails contain CC (carbon copy) and BCC (blind carbon copy) fields which are standard for any email service. Fill out all the information of your conversation, then press the Submit button at the bottom to add that to the list of conversation records.
For more on Conversations and how to use it, please refer to the Getting Started with Conversations guide.
How to process an approval for a lead
An approval is a formal authorization or permission granted by a person or group of people to proceed with a specific action, request or decision. In the context of Leads, approvals are an important tool in ensuring the quality of leads. They demonstrate that your potential customers meet certain criteria or standards before they advance in the sales process. By requiring approval at key stages, businesses can maintain the quality of leads and prevent low-quality or unqualified leads from progressing further, which can save time and resources.
The Leads app provides a method of processing approvals which can be found in the Approvals tab of any lead’s details. Here’s what the approval process looks like:
- An approval request is created – usually with some kind of context into what is being requested.
- A group of approvers is sent the request – with or without some kind of message and deadline.
- The approvers review the information provided by the requestor and either approve or deny the request.
- Based on the approvals of the approvers, a decision is made whether or not to legitimately approve or deny the request.
Let’s try adding our own approval to see what that looks like. In the details of any lead, click the Approvals tab. Here, you will see all of the existing approval requests for that lead.
To add a new approval request, click the + button next to the search bar.
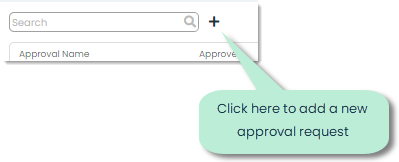
Doing so will open a popup for composing an approval request.
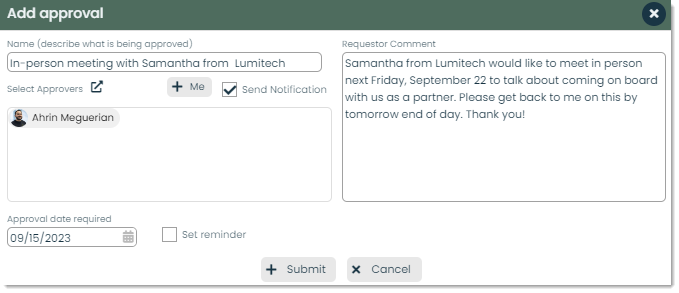
Let’s go over the different fields of this popup.
Name – This is the title of the request and should accurately describe what is being approved.

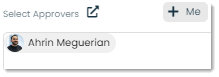
Select Approvers – Here is where you would select the people you’d like to send the approval request to. To make a selection, click on the external link icon next to the Select Approvers caption and choose who you would like to add from the popup. Then, click Submit at the bottom to add those people. They will appear in the box of approvers, and you can edit this selection by clicking the external link icon if needed. If you’d like to include yourself as an approver, simply click the + Me button for a quick add.
Send Notification – If you want to notify your approvers of the approval request, you can do so by checking the box next to Send Notification. All selected approvers will be notified when the request is created.

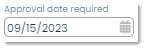
Approval date required – You can set a required-by date for your approvers to ensure that the request is being handled in a timely manner.
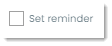
Set reminder – After setting an approval date, you can check the box next to Set reminder to send a reminder notification to your approvers at a specified time. For example, you can set a reminder for them to submit their approval 1 day before the due date of the approval request.
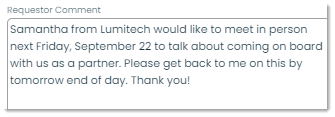
Requestor Comment – This is written by whoever is creating the approval request. It should provide some context and/or directions of how to go about the approval process for a particular lead.
Once all of the necessary request information has been filled out, click + Submit at the bottom to create the request. Each instance of the request sent out will now appear in the Approvals tab of that lead. Here, you can keep track of the status of the approval as well as the approver comments.
Let’s cover the Frontline Features of Leads
Each app has a set of Frontline Features which are designed to enhance your Appward experience. For Leads, these are indicated by the tab names in the details page of any lead. They are:
- Posts
- Attributes
- Relations
- Checklists
- Notes
- Files
- History
Let’s briefly touch on each of these and how they are used in Leads.
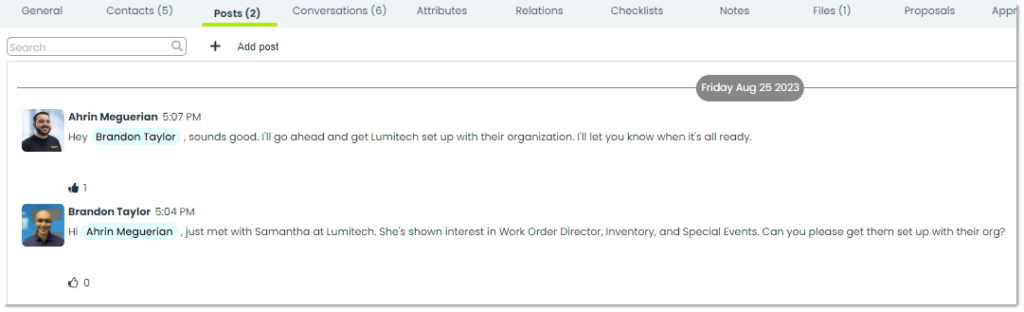
Posts – A post is a written comment which can be replied and reacted to by other people in your organization. You can write a Post with any questions or comments about a lead as well as mention people to quickly link them to a lead record.
Attributes – If you want to add in a custom field or group of fields to enter specific information for a lead but there isn’t one available, you can create your own! For example, say you wanted to add a field for a 1-10 qualified scale. You can create a custom field for that. In the Attributes tab, you can create new attributes by one of the following categories:
- Lead type – Every lead of that type will inherit the attributes
- Record – Only the record you are currently in the details of will gain the attributes
- All records – Every lead will inherit the attributes
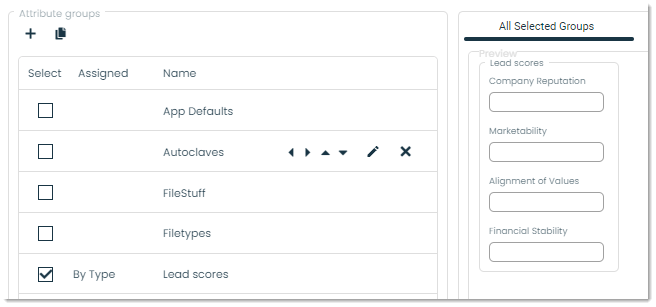
After selecting which attribute groups you’d like to add, you’ll now be able to find them in the Attributes tab and input values!

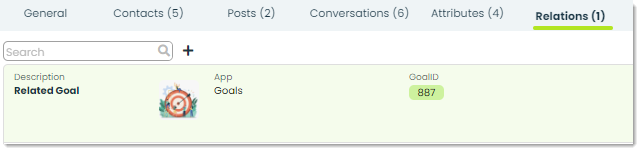
Relations – Relations are used to create a link between different pieces of data. Say, for example, a goal has been created in the Goals app for converting a particular lead to a real customer. If we wanted to link the lead record to the goal record for a centralized set of information, we can accomplish that through a relation.
From the Relations tab, you can click the + button to form a new relation. You can indicate what kind of object the lead is related to, identify the specific record and indicate the relationship between the two records.

From here, you’ll be able to view all related objects from the Relations tab and quickly jump to the related records in their respective apps.
Checklists – Checklists are a method of standardizing the processes of something. In the case of leads, checklists are a great tool for assessing your potential customers on consistent criteria. To add a checklist to a lead, go to the Checklist tab and click Add checklist. For more on creating Checklists, check out Getting Started with Checklist Creator.

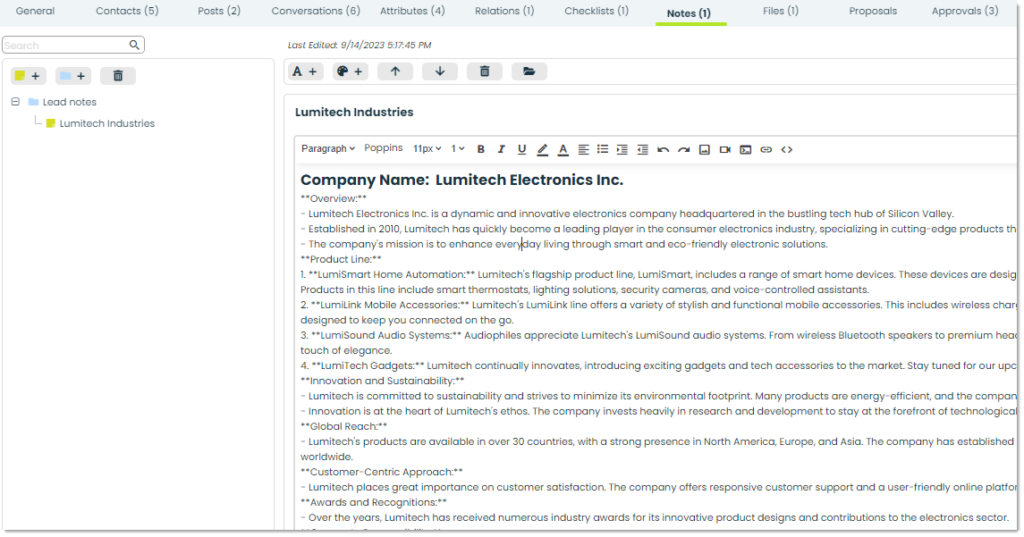
Notes – Any bits or pieces of information that you want to jot down regarding a lead can be input in the Notes tab. You can place your notes into folders for an organized hierarchy of information.
Files – Any important documents that you’d like to attach to a lead record can be added in the Files tab. With this feature, you can add in a lead’s important documents and view them with an embedded document viewer.

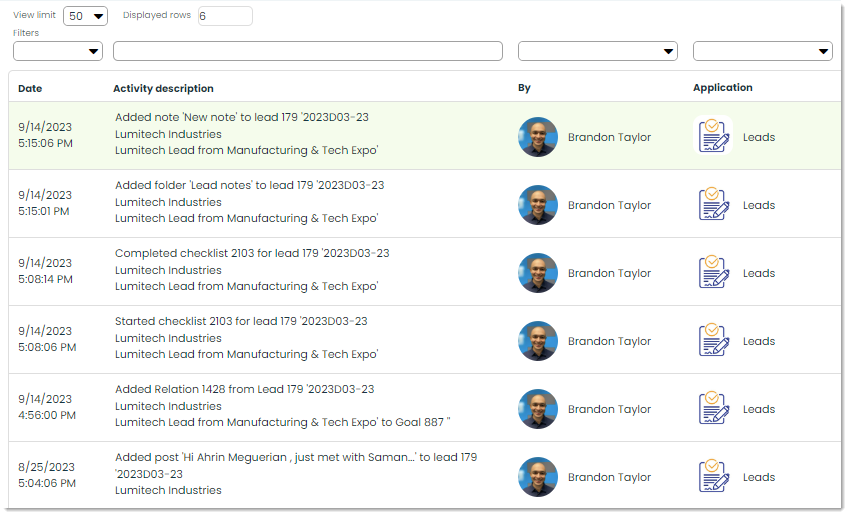
History – The History tab provides a detailed log of recent actions performed on a specific lead record. This is useful for tracking who did what and at what time.
How to set a reminder, archive or delete a lead
This section will go over three features that can be found in the top-right corner of the details page of all lead records. Those are setting reminders, archiving and deleting.

Let’s go through each of these buttons and how they work.
Reminders – Reminders are notifications set for a certain time to a specific person for a specific purpose. In the context of leads, reminders are important for ensuring that you are actively following up with leads. Sometimes, relationships with potential customers can fall through the cracks, and this is a great way to counteract that.
To view all active reminders for a given lead, click the Reminders button.
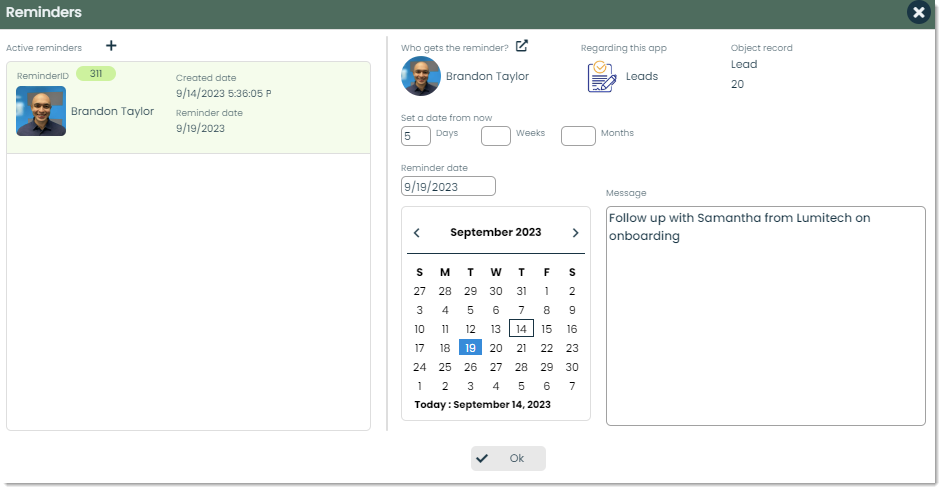
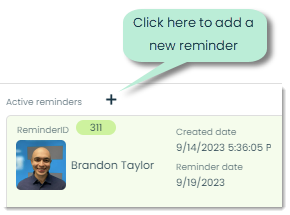
A list of all active reminders will appear on the left side. To add a new one, click the + button next to Active reminders.
You can indicate who gets the reminder, when the reminder should go out and the message to be included in the reminder. When all desired information has been filled out, click Ok at the bottom to create the reminder.
Archive – Archiving is used to store records in a safe, accessible location other than the main list. It’s good for hiding records that don’t need to be seen.
Delete – To delete a lead entirely, you can use this feature and the record will be removed.