Table of contents
Schedule
Friday March 8, 2024-6 min readIntroduction
Tracking important dates and milestones is vital for businesses to stay on track. These dates might involve meetings, deadlines, project phases, and other key events. Efficient schedule management contributes to the smooth functioning of day-to-day operations. In the Appward ecosystem, many apps incorporate scheduling features. You can utilize these tools to create, plan, and even generate Gantt charts to visualize your schedules effectively.
How to create a schedule
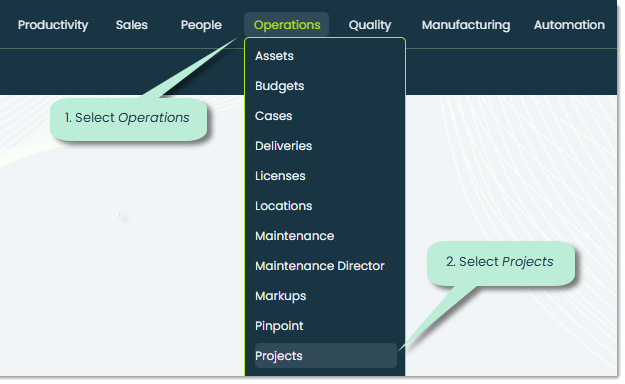
To learn how to create a schedule, let’s take a look at how schedules are used in the Projects app.

Upon launching the Projects app, select a record by clicking on it to access its details.

Once you’ve opened the Projects record, navigate to the Schedule tab.

Within the Schedule tab, begin the process of creating a schedule by locating the + icon on the left side and clicking on it to start the process.

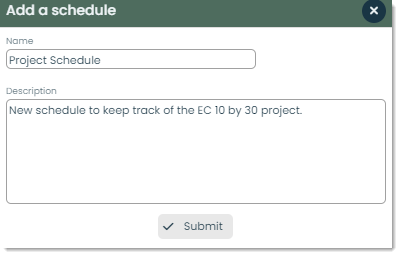
You will then be shown the Add schedule popup, where you can enter in the basic details of your schedule.

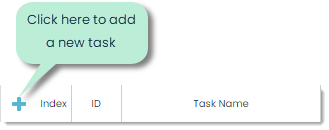
After submitting the basic details of your schedule, you can begin to add tasks. These tasks can then be used to form customized Gantt charts to help you visualize task timelines and dependencies. Click on the blue + icon to add a new task.

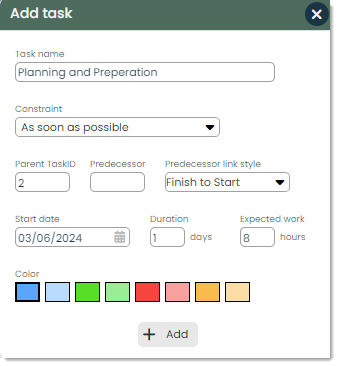
This will bring up the Add task popup. Let’s go over the fields in this popup.

Task name – This is where you can add the name of the task.

Parent TaskID – Defining dependencies and task structure is crucial to keeping efficient work flow. In the Parent TaskID field, you can define what the parent task of the task you’re making will be.

Predecessor – The Predecessor field is where you can define a task that is a dependency for the task you’re making. This means that the predecessor tasks is required to be completed before moving on.

Predecessor link style – You can link the predecessor to the current task in different ways. The most common option would be to use “Finish to Start”, which indicates that the end of the predecessor task will be followed by the start of the next task.

Start date – Set the starting date of the task by selecting from the integrated calendar picker, or type the date in manually using the MM/DD/YYYY format.

Duration – In Duration, you can define the duration of the task in days.

Expected work – In this field you can specify the expect amount of work required to complete this task, in hours.

Color – The color of the block that will be displayed on the Gantt chart representing this task.

+Add – You can press the + Add button to finalize your task submission.

After submitting these details, your new task will be displayed conveniently in an easy-to-use interactive Gantt chart.

